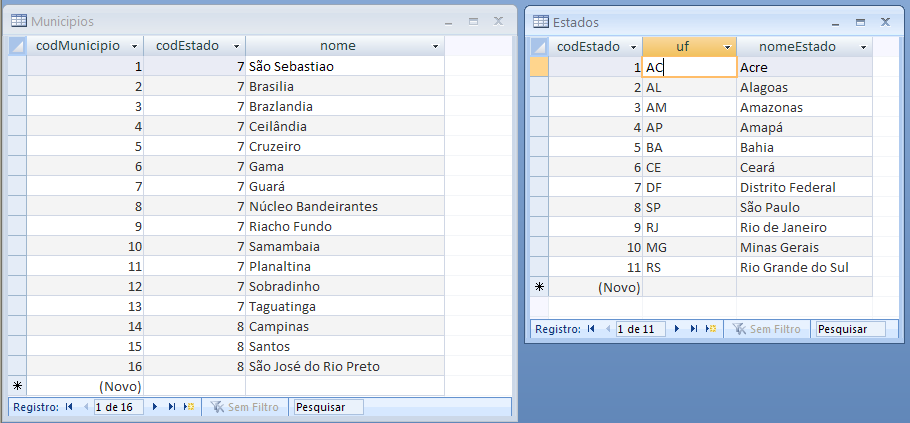
quinta-feira, 30 de dezembro de 2010

ASP.NET Popup Windows With Return Values Redux


Open Method:
Opens a new window and loads the document specified by a given URL.
Syntax
oNewWindow = window.open( [sURL] [sName] [sFeatures] [bReplace])
Details of the available values are given below: 
features ValueDescription
alwaysLoweredWhen set to yes, this creates a window that always floats below other windows.
alwaysRaisedWhen set to yes, this creates a window that always floats above other windows.
dependentWhen set to yes, the new window is created as a child (closes when the parent window closes and does not appear on the task bar on Windows platforms) of the current window.
directoriesWhen set to yes, the new browser window has the standard directory buttons.
heightThis sets the height of the new window in pixels.
hotkeysWhen set to no, this disables the use of hotkeys (except security and quit hotkeys) in a window without a menubar.
innerHeightThis sets the inner height of the window in pixels.
innerWidthThis sets the inner width of the window in pixels.
locationWhen set to yes, this creates the standard Location entry feild in the new browser window.
menubarWhen set to yes, this creates a new browser window with the standard menu bar (File, Edit, View, etc.).
outerHeightThis sets the outer height of the new window in pixels.
outerWidthThis sets the outer width of the new window in pixels.
resizableWhen set to yes this allows the resizing of the new window by the user.
screenXThis allows a new window to be created at a specified number of pixels from the left side of the screen.
screenYThis allows a new window to be created at a specified number of pixels from the top of the screen.
scrollbarsWhen set to yes the new window is created with the standard horizontal and vertical scrollbars, where needed
statusWhen set to yes, the new window will have the standard browser status bar at the bottom.
titlebarWhen set to yes the new browser window will have the standard title bar.
toolbarWhen set to yes the new window will have the standard browser tool bar (Back, Forward, etc.).
widthThis sets the width of the new window in pixels.
z-lockWhen set to yes this prevents the new window from rising above other windows when it is made active (given focus).


These features may only be used with IE:
 
channelmodesets if the window appears in channel mode.
fullscreenthe new window will appear in full screen.
leftsame as screenX, allows a new window to be created at a specified number of pixels from the left side of the screen.
topsame as screenY, allows a new window to be created at a specified number of pixels from the top of the screen.
Return Value
Returns a reference to the new window object. Use this reference to access properties and methods on the new window.
Remarks
By default, the open method creates a window that has a default width and height and the standard menu, toolbar, and other features of Internet Explorer. You can alter this set of features by using the sFeatures parameter. This parameter is a string consisting of one or more feature settings.
When the sFeatures parameter is specified, the features that are not defined in the parameter are disabled. Therefore, when using the sFeatures parameter, it is necessary to enable all the features that are to be included in the new window. If the sFeatures parameter is not specified, the window features maintain their default values. In addition to enabling a feature by setting it to a specific value, simply listing the feature name also enables that feature for the new window.
Internet Explorer 5 allows further control over windows through the implementation of title in the sFeatures parameter of the open method. Turn off the title bar by opening the window from a trusted application, such as Microsoft Visual Basic or an HTML Application (HTA). These applications are considered trusted, because each uses Internet Explorer interfaces instead of the browser.
When a function fired by an event on any object calls the open method, the window.open method is implied.
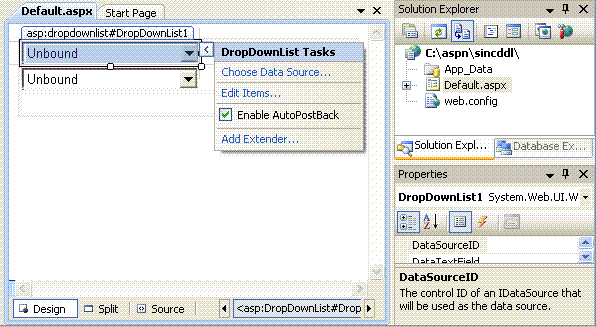
OK! Now that we have some documentation, let's look at how to wire up some usable code. First, all the javascript needed for both the parent page and the popup window page is created and emitted from the compiled codebehind classes in this approach. You should never have to look at the ASPX "HTML" for script. There isn't any, until the page is rendered.
The key to returning values from a popup window is that ReturnValue object. When a child window is closed, the returnvalue of the window.open() method is populated. In the child window, you can assign an array to the window.returnValue object, and the parent window can read them out and thus receive multiple values. However, in this approach I use a completely different method that I believe is easier.
My parent window will have an update(array) method that expects a Javascript array - but instead of using the window.returnValue object, I'll simply have the child window call the parent.update(array) method when it closes. In this manner, everything is taken care of in one operation.
Here's the code for the parent page:
public class Default : Page
    {
        protected TextBox txtFirstName;
        protected TextBox txtLastName;
        protected Label Label1;
        protected Label Label2;
        protected HyperLink HyperLink1;

        private void Page_Load(object sender, EventArgs e)
        {
            //create our update function
            string scr = @"<script>
                    function update(elemValue)
                  {
                    document.getElementById('txtFirstName').innerText=elemValue[0];
                    document.getElementById('txtLastName').innerText=elemValue[1];
                  }
                  </script>";
            // register the javascript into the Page
            Page.RegisterClientScriptBlock("update", scr);
            //add our popup onclick attribute to the desired element on the page (Here, Hyperlink1)
            HyperLink1.Attributes.Add("onclick", "window.open('popup.aspx',null,'left=400, top=100, height=250, width= 250, status=n o, resizable= no, scrollbars= no, toolbar= no,location= no, menubar= no');");


        }
And, here's the code for the child "Popup" page:
public class popup : System.Web.UI.Page
    {
        protected System.Web.UI.WebControls.TextBox TextBox1;
        protected System.Web.UI.WebControls.Label Label2;
        protected System.Web.UI.WebControls.TextBox txtLastName;
        protected System.Web.UI.WebControls.TextBox txtFirstName;
        protected System.Web.UI.WebControls.Label Label1;

        private void Page_Load(object sender, System.EventArgs e)
        { 
            string scr= @"<script>
        function Done()
            {                                                                               
            var fName=document.getElementById('txtFirstName').value;     
var lName=document.getElementById('txtLastName').value;   
var ret= new Array(fName,lName);
window.opener.update(ret);       
            window.close(); 
            } 
           </script>;";
            Page.RegisterClientScriptBlock("done", scr);
        }
The result, when the hyperlink is clicked, will look like this when the popup is being filled in:
And it will look like so when the user closes the popup:

AJAX Control Toolkit

The AJAX Control Toolkit contains more than 30 free controls that you can use in your ASP.NET applications. In this tutorial, you learn how to download the AJAX Control Toolkit and add the toolkit controls to your Visual Studio/Visual Web Developer Express toolbox.

Downloading the AJAX Control Toolkit

The AJAX Control Toolkit is an open source project developed by the members of the ASP.NET community and the ASP.NET team. The AJAX Control Toolkit is hosted at CodePlex.com which is the Microsoft website for hosting open source projects.
Navigate to the following URL to go directly to the AJAX Control Toolkit CodePlex page:
Click the Downloads link (see Figure 1) to see a list of different versions of the AJAX Control Toolkit. For example, you can download the version of the toolkit that contains the AJAX Control Toolkit controls. Alternatively, you can download the full version of the Toolkit that contains the controls, a sample site, and the source code for the controls.
Downloading the AJAX Control Toolkit
Figure 01: Downloading the AJAX Control Toolkit(Click to view full-size image)
After you download the file, you need to unblock the file. Right-click the file, select Properties, and click theUnblock button (see Figure 2).
Unblocking the AJAX Control Toolkit ZIP file
Figure 02: Unblocking the AJAX Control Toolkit ZIP file(Click to view full-size image)
After you unblock the file, you can unzip the file: Right-click the file and select the Extract All menu option. Now, we are ready to add the toolkit to the Visual Studio/Visual Web Developer toolbox.

Adding the AJAX Control Toolkit to the Toolbox

The easiest way to use the AJAX Control Toolkit is to add the toolkit to your Visual Studio/Visual Web Developer toolbox (see Figure 3). That way, you can simply drag a toolkit control onto a page when you want to use it.
AJAX Control Toolkit appears in toolbox
Figure 03: AJAX Control Toolkit appears in toolbox(Click to view full-size image)
First, you need to add an AJAX Control Toolkit tab to the toolbox. Follow these steps.
  1. Create a new ASP.NET Website by selecting the menu option File, New Website. Double-click the Default.aspx in the Solution Explorer window to open the file in the editor.
  2. Right-click the Toolbox beneath the General Tab and select the menu option Add Tab (see Figure 4).
  3. Enter a new tab named AJAX Control Toolkit.
Adding a new tab
Figure 04: Adding a new tab(Click to view full-size image)
Next, you need to add the AJAX Control Toolkit controls to the new tab. Follow these steps:
  • Right-click beneath the AJAX Control Toolkit tab and select the menu option Choose Items (see Figure 5).
  • Browse to the location where you unzipped the AJAX Control Toolkit and select the AjaxControlToolkit.dll assembly.
Choose items to add to the toolbox
Figure 05: Choose items to add to the toolbox(Click to view full-size image)
After you complete these steps, all of the toolkit controls will appear in your toolbox.

quarta-feira, 29 de dezembro de 2010

ASP.NET - DropDownList

Vamos agora mostrar como sincronizar dois controles DropDownList : Um controle irá exibir os nomes dos produtos da tabela produto e o outro controle irá exibir os produtos relacionados na tabela Detalhes do Pedido.
Com ASP .NET 2.0 ficou muito simples sincronizar dois ou mais controles dropdownlist.
Vamos ao um exemplo clássico : Em uma página ASP .NET eu desejo exibir os estados do Brasil em um DropDownList e quando conforme a seleção do usuário o segundo DropDownList será preenchido com as cidades daquele estado.
Eu vou usar um banco de dados chamado Teste.mdb e duas tabelas : uma contendo o codigoEstado , nomeEstado e siglaEstado para os estados e outra contendo o codigoCidade , codigoEstado, nomeCidade para os municípios:

Como vamos usar um banco de dados devemos criar uma conexão com o banco de dados Teste.mdb ou copiar o arquivo para a pasta App_Code.
Você pode usar o Visual Web Developer 2005 ou 2008 para acompanhar o exemplo a seguir.
Abra o Visual Web Developer e crie um novo web site chamado sincddl usando a linguagem VB;
A seguir no formulário padrão Default.aspx inclua os dois controles DropDownList com name igual a ddl1 e ddl2;
Selecione o primeiro dropdownlist e em DropDownList Tasks marque Enable AutoPostBack e clique em Choose Data Source...
A seguir em Choose Data Source selecione <New data source...> e clique em OK;
Na próxima janela do assistente marque a opção Access DataBase pois vamos trabalhar com uma tabela Access , mas poderíamos trabalhar com SQL Server, LINQ, Object,  XML , etc. Informe o nome dsTeste e clique em OK;
Na janela Configure Data Source clique no botão Browse e selecione o banco de dados Teste.mdb na pasta App_data;

A seguir selecione a tabela Estados e marque os campos codEstado e nomeEstado;

Importante !!! Selecione o campo nomeEstado para ser exibido no dropdownlist e o campo codEstado como sendo o valor do dropdownlist usado na seleção;

Com isso já teremos a exibição dos estados na primeira dropdownlist - ddl1.
O que desejamos fazer é preencher a segunda dropdownlist de acordo com a seleção feita na primeira.
Selecione o segundo dropdownlist e repita os mesmos passos efetuados para o primeiro:
Em DropDownList Tasks e clique em Choose Data Source.../
A seguir em Choose Data Source selecione <New data source...> e clique em OK;
- Na próxima janela do assistente marque a opção Access DataBase.  Informe o nome dsTeste2 e clique em OK;
- Na janela Configure Data Source clique no botão Browse e selecione o banco de dados Teste.mdb na pasta App_data;
- A seguir selecione a tabela Municipios e marque todos os campos; ( Agora preste atenção ...)
- Clique no botão WHERE para montar uma condição de exibição de dados para o controle;
Na janela add WHERE Clause selecione o campo para o qual deseja criar a condição , no nosso caso o campo codEstado;
Em seguida selecione de onde deverá sair o parâmetro para estipular a condição. No nosso caso o parâmetro virá do primeiro controle dropdownlist - ddl1;
Em seguida clique no botão Add e em OK;
Veja a consulta SQL criada contendo a cláusula Where indicando que será selecionado os campos da tabela Municipios onde o codEstado for igual ao valor selecionado no primeiro dropdownlist;
Na última janela do assistente selecione para exibir o nome do município e o campo codMunicipio para ser o valor do dropdownlist;
Pronto.
Podemos executar a página e iremos verificar que conforme a seleção do primeiro controle dropdownlist o segundo será preenchido automaticamente;


segunda-feira, 6 de dezembro de 2010

Base de Dados - PostgreSQL no Xampp

1. Install PostgreSQL and phpPgAdmin in Windows :

1.1 Install PostgreSQL
Assuming you have already download and installed XAMPP into c:\XAMPP, go and get the latest version of PostgreSQL for Windows. Download the version with the installer, not the one with only binaries.

Usually, it's a .zip package, extract it and install Microsoft Visual C++ 2005 redistributable vcredist_x86.exe first!

Now, double-click postgresql-8.3.msi, choose your install language, then have a look at installation notes as you may find useful info there.

Change the default install folder to c:\xampp\pgsql
The default install options in the following step are OK, but select everything you are unsure.

Enter a password for the user account "postgres" and leave everything as is in Service Configuration, then proceed to the next step. (You will need that password for future upgrades)

In Initialize Database Cluster:

  • Enable "Accept connections on all addresses, not just localhost" if you want.
  • Choose a different Encoding for both Server and Client (i.e: UTF8 for unicode support)
  • Enter a password for the DB administrator account "postgres".
Proceed as PL/pgsql is enabled by default in Procedural Langauges, then select Contrib Modules you want (select everything if you are unsure). Click on Install.

1.2 Install phpPgAdmin
Go and get the latest phpPgAdmin zip package and extract it into C:\xampp\phpPgAdmin\ . Make sure the files and folders extracted are in that folder, not within another sub-folder.

Then open "config.inc.php" found in C:\xampp\phpPgAdmin\conf\ and set "extra_login_security" to false
$conf['extra_login_security'] = false;

Now, open c:\xampp\php\php.ini and make sure "extension=php_pgsql.dll" is uncommented

Finally, open c:\xampp\apache\conf\extra\httpd-xampp.conf and in section add
Alias /phppgadmin "c:/xampp/phpPgAdmin/"

AllowOverride AuthConfig
Order allow,deny
Allow from all

That's all, you can now access phpPgAdmin from your web browser with http://localhost/phppgadmin/

Notes:
  • For more info about PostgreSQL Installer visit http://pginstaller.projects.postgresql.org/FAQ_windows.html
  • You may use Stack Builder shipped with PostgreSQL to add new functionalities.
  • Visit the phpPgAdmin FAQ for any further info http://phppgadmin.sourceforge.net/?page=faq

Tutorial PostgreSQL


sábado, 4 de dezembro de 2010

32 bits vs 64 bits


Windows 7
Para verificar se o seu windows 7 é de 32 bits ou 64 bits, vamos a iniciar, depois Computer, carregamos no botão do lado direito do rato e depois Properties
bits_w1
Aparecerá de imediato uma janela que nos permite visualizar se o nosso sistema operativo é de 32 bits ou 64 bits. No meu caso é de 64 bits, logo a capacidade para lidar com memória RAM acima dos 3 GB.
w7_bits
Para quem quiser saber mais informações do sistema pode consultar os seguintes artigos:
Linux
No caso do Linux, basta abrirmos o terminal e inserir o seguinte comando:
uname –m
Linux_bits
  • No caso do resultado ser i686, então o nosso sistema operativo é de 32-bits
  • No caso da resposta ser x86_64, então estamos perante um sistema operativo de 64-bits
Para quem quiser informações mais detalhadas, pode sempre usar o comando uname –a, que devolve informação sobre o Kernel, arquitectura do processador
linux_bits2
Mac
No MAC vamos começar pelo processador. Para isso vamos a About This Mac a partir do menu Apple ()e depois carregar em More Info. Abrir a parte do Hardware e em seguida, Processor Name.
mac_bits3
Pela tabela seguinte, podemos verificar que pelo screen anterior estamos perante um processador que suporta apenas 32 bits.
mac_bits2A partir da geração Core 2 Duo em diante, todos os processadores Intel são dotados da arquitectura 64-bit e no MacOsX ele irá automaticamente usufruir desta arquitectura assim que detecte o CPU uma vez que este sistema é híbrido, ou seja, não existem versões especificas 32-bit e outra de 64-bit, portanto usar aplicações 64-bit e 32-bit são possíveis de raiz.
A única coisa que vem desactivada por pré-definição são as extensões e kernel que por motivos de compatibilidade com acessórios e outros programas, correm nativamente a 32-bit, a não ser que o utilizador altere as opções ou durante o boot do Mac pressione as teclas 6 e 4 ao mesmo tempo. Contudo esta ultima opção é desnecessária uma vez que quer a Memoria Ram, quer os programas 64-bit não ficam limitados pelo Kernel e Extensões correrem a 32-bit, ou seja, se tiver 8GB de Memoria Ram, o sistema assim detectará na mesma.
Para verificarem quais as aplicações que correm a 64-bit, basta abrirem as mesmas opções acima descritas (About This Mac / More info) e percorrer a lista “Software” ; “Aplicações” onde irá encontrar todas as informações sobre as aplicações instaladas no seu Mac, indicando a versão das mesmas, ultimas alterações efectuadas, tipo de arquitectura usada (Intel ; PowerPC ; Universal ) e devido binário (32-bit ou 64-bit).
O conhecimento da arquitectura do nosso processador é importante pois assim podemos tirar partido do mesmo. Lembramos que as arquitecturas de 64 bits são normalmente retrocompatíveis com as de 32 bits, mas o contrário já não é verdade.

GMail - Atalhos do teclado


Tecla de atalhoConfiguraçãoAção
cEscreverPermite que você escreva uma nova mensagem. <Shift> + c permite que você escreva uma mensagem em uma nova janela.
/PesquisarColoca o cursor na caixa de pesquisa.
kMover para conversa mais recenteAbre ou move o cursor para uma conversa mais recente. Você pode pressionar <Enter> para expandir uma conversa.
jMover para conversa mais antigaAbre ou move o cursor para a próxima conversa mais antiga. Você pode pressionar <Enter> para expandir uma conversa.
nPróxima mensagemMove o cursor para a próxima mensagem. Você pode pressionar<Enter> para expandir ou recolher uma conversa. (Aplica-se somente à 'visualização de conversa'.)
pMensagem anteriorMove o cursor para a mensagem anterior. Você pode pressionar <Enter>para expandir ou recolher uma conversa. (Aplica-se somente à 'visualização de conversa'.)
o ou <Enter>AbrirAbre sua conversa. Também expande ou recolhe uma mensagem se você estiver na 'visualização de conversa'.
uRetorna à lista de conversaAtualiza sua página e retorna à caixa de entrada ou a uma lista de conversas.
eArquivarArquivar sua conversa de qualquer visualização.
mDesativar somArquiva a conversa e todas as mensagens futuras pulam a Caixa de entrada, exceto se forem enviadas ou copiadas em Cc diretamente para você.Saiba mais.
xSelecionar uma conversaMarca e seleciona automaticamente uma conversa para que você possa arquivar, aplicar um marcador ou escolher uma ação do menu suspenso a ser aplicada à conversa.
sMarcar uma mensagem ou conversa com estrelaAdiciona ou remove uma estrela de uma mensagem ou conversa. As estrelas permitem que você dê um status especial a uma mensagem ou conversa.
+Marcar como importanteAjuda o Gmail a aprender o que é importante para você ao marcar mensagens classificadas incorretamente. (Específico da Caixa prioritária)
-Marcar como não importanteAjuda o Gmail a aprender o que não é importante para você ao marcar mensagens classificadas incorretamente. (Específico da Caixa prioritária)
!Denunciar spamMarca uma mensagem como spam e a remove da lista de conversa.
rResponderResponde ao remetente da mensagem.<Shift> + r permite que você responda a uma mensagem em uma nova janela. (Aplica-se somente à 'visualização de conversa'.)
aResp p/ todosResponde a todos os destinatários da mensagem. <Shift> +a permite que você responda a todos os destinatários da mensagem em uma nova janela. (Aplica-se somente à 'visualização de conversa'.)
fEncaminharEncaminha uma mensagem. <Shift> + fpermite que você encaminhe uma mensagem em uma nova janela. (Aplica-se somente à 'visualização de conversa'.)
<Esc>Esc para sair do campo de preenchimentoRemove o cursor do campo de preenchimento atual.
<Ctrl> + sSalvar rascunhoSalva o texto atual como rascunhodurante a criação de uma mensagem. Mantenha a tecla <Ctrl> pressionada ao pressionar s e verifique se o cursor está em um dos campos de texto -- seja no painel de redação ou em qualquer dos campos Para, CC, CCO ou Assunto -- ao usar esse atalho.
#ExcluirMove a conversa para a Lixeira.
lMarcadorAbre o menu Marcadores para marcar uma conversa.
vMover paraMove a conversa da caixa de entrada para um marcador diferente, Spam ou Lixeira.
<Shift> + iMarcar como lidosMarca sua mensagem como 'lida' e vai para a próxima mensagem.
<Shift> + uMarcar como não lidoMarca sua mensagem como 'não lida' para que você possa verificá-la depois.
[Arquivar e anteriorArquiva sua conversa e move para a anterior.
]Arquivar e próximaArquiva sua conversa e move para a próxima.
zDesfazerDesfaz sua ação anterior, se possível (funciona para ações que tenham um link 'desfazer').
<Shift> + nAtualizar conversa atualAtualiza sua conversa atual quando há novas mensagens.
qMove cursor para pesquisa de bate-papoMove o cursor diretamente para a caixa de pesquisa de bate-papo.
yRemover da visualização atual*Remove automaticamente a mensagem ou conversa da visualização atual.
  • Na 'Caixa de entrada', 'y' significaArquivar
  • Em 'Com estrela', 'y' significaRetirar estrela
  • Na 'Lixeira', 'y' significa Mover para caixa de entrada
  • Em qualquer marcador, 'y' significa Remover o marcador
* 'y' não tem efeito se você estiver em 'Spam,' 'Enviados' ou 'Todos os e-mails'.
.Mostrar mais açõesExibe o menu suspenso 'Mais ações'.
<Ctrl> + <Seta para baixo>Abre opções no Bate-papo
  • <Ctrl> + <Seta para baixo> move do campo de edição na janela de bate-papo para selecionar o menu 'Vídeo e mais'
  • Em seguida, pressione <Tab> para selecionar o menu de emoticon
  • Pressione <Enter> para abrir o menu selecionado
?Mostrar ajuda de atalhos do tecladoMostra o menu de ajuda dos atalhos do teclado em qualquer página em que você estiver.
kMover um contato para cimaMove o cursor para cima na lista de contatos
jMover um contato para baixoMove o cursor para baixo na lista de contatos
o ou <Enter>AbrirAbre o contato que tem o cursor ao lado dele.
uRetornar para visualização de lista de contatosAtualiza a página e volta para a lista de contatos.
eRemover do grupo atualRemove os contatos selecionados do grupo que está sendo exibido.
xSelecionar contatoMarca e seleciona um contato para que você possa alterar sua filiação em grupo ou escolher uma ação do menu suspenso a ser aplicada ao contato.
<Esc>Esc para sair do campo de preenchimentoRemove o cursor do preenchimento atual
#ExcluirExclui um contato permanentemente
lFiliação em grupoAbre o botão de grupos para agrupar contatos
zDesfazerReverte sua ação anterior, se possível (funciona para ações que tenham um link 'desfazer')
.Mostrar mais açõesAbre o menu suspenso 'Mais ações'.

Teclas de combinação - Use as seguintes teclas de combinação para navegar pelo Gmail.
Tecla de atalhoConfiguraçãoAção
<Tab> depois <Enter>Enviar mensagemDepois de escrever sua mensagem, use essa combinação para enviá-la automaticamente. (Compatível com Internet Explorer e Firefox, no Windows.)
y depois oArquivar e próximaArquiva sua conversa e move para a próxima.
g depois aIr para 'Todos os e-mails'Vai para 'Todos os e-mails', o site de armazenamento de todos os e-mails que você já enviou ou recebeu (e não excluiu).
g depois sIr para 'Com estrela'Vai para todas as conversas que você marcou com estrela.
g depois cIr para 'Contatos'Vai para a lista de contatos.
g depois dIr para 'Rascunhos'Vai para todos os rascunhos que você salvou.
g depois lIr para 'Marcador'Vai para a caixa de pesquisa com o campo "label:" preenchido para você.
g depois iIr para 'Caixa de entrada'Volta para a caixa de entrada.
g depois tIr para 'E-mails enviados'Vai para todos os emails que você enviou.
* depois aSelecionar todosSeleciona todos os e-mails.
* depois nSelecionar nenhumCancela a seleção de todos os e-mails.
* depois rSelecionar lidosSeleciona todos os e-mails que você leu.
* depois uSelecionar não lidosSeleciona todos os e-mails não lidos.
* depois sSelecionar com estrelaSeleciona todos os e-mails marcados com estrela.
* depois tSelecionar não marcados com estrelaSeleciona todos os e-mails não marcados com estrela.