sexta-feira, 18 de outubro de 2019

Spring Boot RESTful Web Service

After the huge response and viewership for my earlier article, I have decided to write a new article with all the REST calls example respectively GET, POST, PUT, and DELETE.
Let’s start this project step by step.
Prerequisites for this project:
  • If you have Eclipse, download the STS plug-in from here.
  • If you don’t have Eclipse, download STS from here.
  • Download the latest JDK from here
  • Also for testing please download and install SOAPUI tool from here
The first example I am going to explain is about HTTP GET request, the second example will be about HTTP POST request, the third example about HTTP PUT request, and the fourth example is for HTTP DELETE request. In all of these examples, I am going to use JSON Representation.
You can download this project from here.
  1. First, create a folder in your C drive: C:\Projects
  2. Open eclipse and select work space as: C:\Projects
  3. From the File menu, select "New" and then "other," and from wizard, expand "Spring Boot" and select "Spring Starter Project" (File->New->other->wizard->Spring Starter Project).
Image title
        Now click the Next button and provide the below information and click the Next button again.
Image title
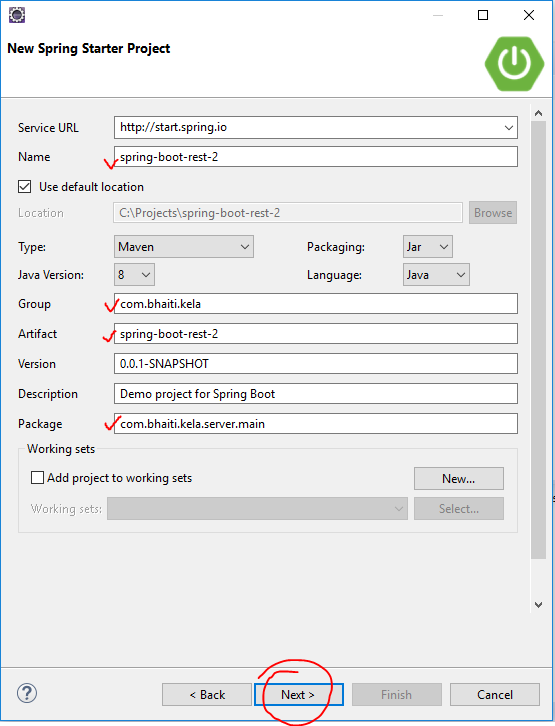
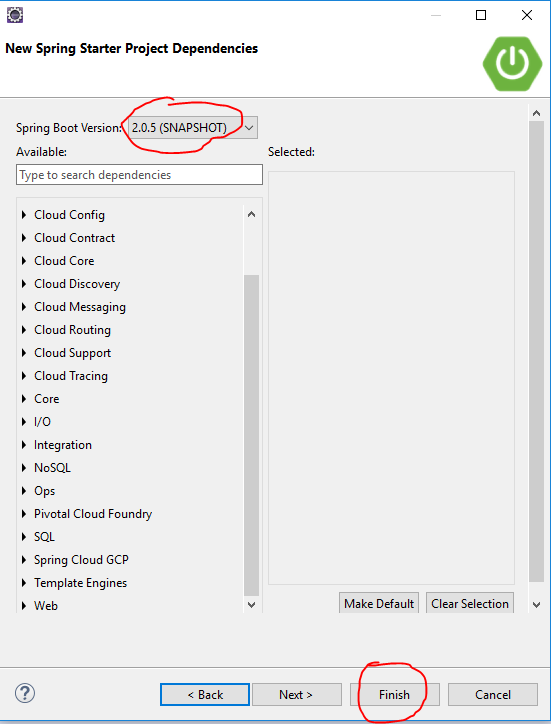
        Now, provide/select the below information and click the Finish button.
Image title
        Now you can see the below project structure in your project's explorer window.
Image title
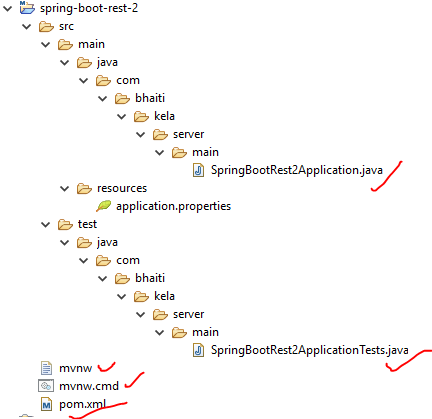
Now, look that the SpringBootRest2Application.java file, which is created by the STS plug-ins.
package com.bhaiti.kela.server.main;
import org.springframework.boot.SpringApplication;
import org.springframework.boot.autoconfigure.SpringBootApplication;
@SpringBootApplication
public class SpringBootRest2Application {
    public static void main(String[] args) {
    SpringApplication.run(SpringBootRest2Application.class, args);
    }
}
This is a Spring Boot main class. A Spring Boot REST application loads through this class. We can also see that this class is created with the annotation @SpringBootApplication . As per the Spring documentation, the annotation @SpringBootApplication is equivalent to using @Configuration@EnableAutoConfiguration, and @ComponentScan, and these annotations are frequently used together. Most of the time, in Spring Boot development, the main class is always annotated with all three of these important annotations.
So we are going to modify the @SpringBootApplication (given below in the Java class) with a component path. Without that, the application cannot find out the controller classes. We will learn more about controller classes in a few minutes.
@SpringBootApplication(scanBasePackages = {"com.bhaiti"})
public class SpringBootRest2Application {
    public static void main(String[] args) {
    SpringApplication.run(SpringBootRest2Application.class, args);
    }
}
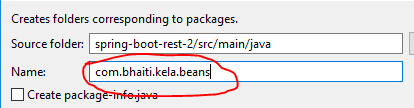
Now we are going to create our beans classes, which we will use for our GET, POST, PUT, and DELETE REST calls. Create package, com.bhaiti.beans, and add classes into that package like below:
4. Right-click on the project and select New and then package (New=>Package). Enter the above package name and click Finish.
Image title
5. Now, right-click on the package com.bhaiti.beans and select New->class and provide the class name, Student, like below:
Image title
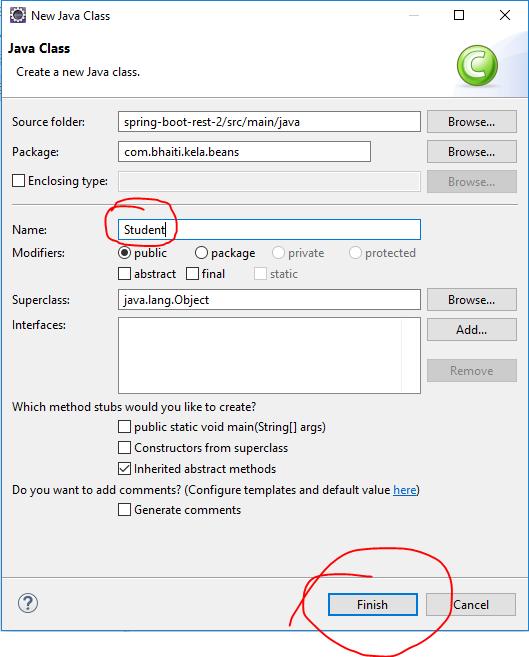
  •     In the empty class, just add below members:
package com.bhaiti.kela.beans;
public class Student {
    String name;
    int age;
    String registrationNumber;
}
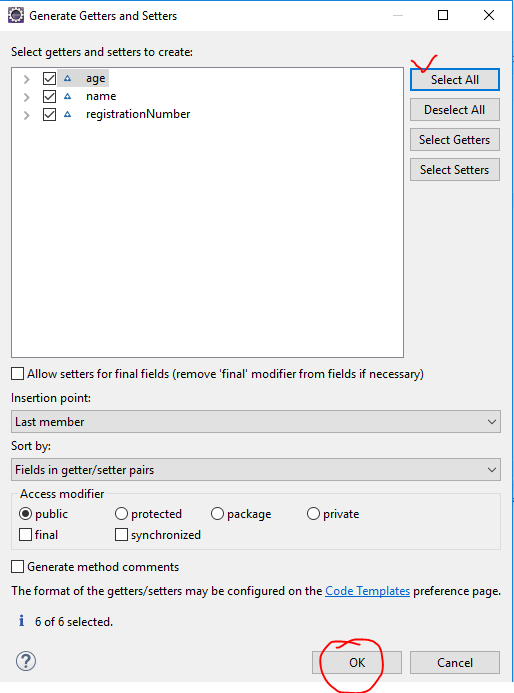
  • Now create getter and setter methods for these members. For that, from the Project Explorer window, right-click on the class "Student" and select “Source” and select “Generate Getter and Setter.”
Image title
package com.bhaiti.kela.beans;
public class Student {
    String name;
    int age;
    String registrationNumber;
    public String getName() {
    return name;
    }
    public void setName(String name) {
    this.name = name;
    }
    public int getAge() {
    return age;
    }
    public void setAge(int age) {
    this.age = age;
    }
    public String getRegistrationNumber() {
    return registrationNumber;
    }
    public void setRegistrationNumber(String registrationNumber) {
    this.registrationNumber = registrationNumber;
    }
}
6. Now follow steps 5 and create class call StudentRegistration and modify it like below:
package com.bhaiti.kela.beans;
import java.util.ArrayList;
import java.util.List;
public class StudentRegistration {
    private List<Student> studentRecords;
    private static StudentRegistration stdregd = null;
    private StudentRegistration(){
    studentRecords = new ArrayList<Student>();
    }
    public static StudentRegistration getInstance() {
        if(stdregd == null) {
              stdregd = new StudentRegistration();
              return stdregd;
            }
            else {
                return stdregd;
            }
    }
    public void add(Student std) {
    studentRecords.add(std);
    }
public String upDateStudent(Student std) {
for(int i=0; i<studentRecords.size(); i++)
        {
            Student stdn = studentRecords.get(i);
            if(stdn.getRegistrationNumber().equals(std.getRegistrationNumber())) {
              studentRecords.set(i, std);//update the new record
              return "Update successful";
            }
        }
return "Update un-successful";
}
public String deleteStudent(String registrationNumber) {
for(int i=0; i<studentRecords.size(); i++)
        {
            Student stdn = studentRecords.get(i);
            if(stdn.getRegistrationNumber().equals(registrationNumber)){
              studentRecords.remove(i);//update the new record
              return "Delete successful";
            }
        }
return "Delete un-successful";
}
    public List<Student> getStudentRecords() {
    return studentRecords;
    }
}
7. Now add a class calls StudentRegistrationReply and modify like below. This class will be used to reply a response back to the client application
package com.bhaiti.kela.beans;
public class StudentRegistrationReply {
    String name;
    int age;
    String registrationNumber;
    String registrationStatus;
    public String getName() {
    return name;
    }
    public void setName(String name) {
    this.name = name;
    }
    public int getAge() {
    return age;
    }
    public void setAge(int age) {
    this.age = age;
    }
    public String getRegistrationNumber() {
    return registrationNumber;
    }
    public void setRegistrationNumber(String registrationNumber) {
    this.registrationNumber = registrationNumber;
    }
    public String getRegistrationStatus() {
    return registrationStatus;
    }
    public void setRegistrationStatus(String registrationStatus) {
    this.registrationStatus = registrationStatus;
    }
}
8. Now we will introduce two controllers, one to serve the GET request and the second one to serve the POST request. With the GET request, we will retrieve all Student Registration information, and with the POST request, we will add student information into our application. In spring’s approach to build a RESTful web services, HTTP requests are handled by a controller. Controller classes/components are easily identified by the @RestController annotation, and the below StudentRetrieveController will handle GET requests for /student/allstudent by returning a list of Student class objects in JSON format.
  • Now just follow step 4  and step 5 and create the package com.bhaiti.kela.controllers and add the class StudentRetrieveController to it and import the class Student and modify the class like below:-
package com.bhaiti.kela.controllers;
import java.util.List;
import org.springframework.stereotype.Controller;
import org.springframework.web.bind.annotation.RequestMapping;
import org.springframework.web.bind.annotation.RequestMethod;
import org.springframework.web.bind.annotation.ResponseBody;
import com.bhaiti.kela.beans.Student;
import com.bhaiti.kela.beans.StudentRegistration;
@Controller
public class StudentRetrieveController {
  @RequestMapping(method = RequestMethod.GET, value="/student/allstudent")
  @ResponseBody
  public List<Student> getAllStudents() {
  return StudentRegistration.getInstance().getStudentRecords();
  }
}
The @RequestMapping annotation maps all HTTP operations by default and, in this example, it ensures that HTTP requests to /student/allstudent are mapped to the getAllStudents() method.
Now we are done with everything for a GET RESTful call. Let’s implement a RESTFul POST call.
  • Now it's time to introduce the controller class to handle the POST request. Follow step 5 and add below controller class StudentRegistrationController in package  com.bhaiti.kela.controllers
package com.bhaiti.kela.controllers;
import java.util.List;
import org.springframework.stereotype.Controller;
import org.springframework.web.bind.annotation.RequestBody;
import org.springframework.web.bind.annotation.RequestMapping;
import org.springframework.web.bind.annotation.RequestMethod;
import org.springframework.web.bind.annotation.ResponseBody;
import com.bhaiti.kela.beans.*;
@Controller
public class StudentRegistrationController {
  @RequestMapping(method = RequestMethod.POST, value="/register/student")
  @ResponseBody
  public StudentRegistrationReply registerStudent(@RequestBody Student student) {
  System.out.println("In registerStudent");
        StudentRegistrationReply stdregreply = new StudentRegistrationReply();           
        StudentRegistration.getInstance().add(student);
        //We are setting the below value just to reply a message back to the caller
        stdregreply.setName(student.getName());
        stdregreply.setAge(student.getAge());
        stdregreply.setRegistrationNumber(student.getRegistrationNumber());
        stdregreply.setRegistrationStatus("Successful");
        return stdregreply;
}
}
Till now, we are done with everything for a GET and POST RESTful call. Let’s test this application first. After the test, we will learn about PUT and DELETE calls as well. First, we need to compile the application. 
  • Compilation: To compile this project with Maven, we will add the below information into the POM file: Double click and open the POM file from project explorer window and add below information under “<dependencies>” section.
    <dependency>
        <groupId>org.springframework.boot</groupId>
        <artifactId>spring-boot-starter</artifactId>
    </dependency>
    <dependency>
        <groupId>org.springframework.boot</groupId>
        <artifactId>spring-boot-starter-test</artifactId>
        <scope>test</scope>
    </dependency>
    <dependency>
        <groupId>org.springframework.boot</groupId>
        <artifactId>spring-boot-starter</artifactId>
    </dependency>
    <dependency>
        <groupId>org.springframework</groupId>
        <artifactId>spring-web</artifactId>
    </dependency>
    <dependency>
        <groupId>org.springframework.boot</groupId>
        <artifactId>spring-boot-starter-web</artifactId>
    </dependency>
    <dependency>
        <groupId>org.springframework.boot</groupId>
        <artifactId>spring-boot-starter-test</artifactId>
        <scope>test</scope>
    </dependency>
And we'll also add the below information for the property file for this project under the build section of our POM.xml file (to change the port number at the moment):
        <resource>
            <directory>src/main/resources</directory>
            <filtering>true</filtering>
        </resource>
your  POM.xml file finally looks like below:
<?xml version="1.0" encoding="UTF-8"?>
<project xmlns="http://maven.apache.org/POM/4.0.0" xmlns:xsi="http://www.w3.org/2001/XMLSchema-instance"
xsi:schemaLocation="http://maven.apache.org/POM/4.0.0 http://maven.apache.org/xsd/maven-4.0.0.xsd">
<modelVersion>4.0.0</modelVersion>
<groupId>com.bhaiti.kela</groupId>
<artifactId>spring-boot-rest-2</artifactId>
<version>0.0.1-SNAPSHOT</version>
<packaging>jar</packaging>
<name>spring-boot-rest-2</name>
<description>Demo project for Spring Boot</description>
<parent>
<groupId>org.springframework.boot</groupId>
<artifactId>spring-boot-starter-parent</artifactId>
<version>2.0.5.BUILD-SNAPSHOT</version>
<relativePath/> <!-- lookup parent from repository -->
</parent>
<properties>
<project.build.sourceEncoding>UTF-8</project.build.sourceEncoding>
<project.reporting.outputEncoding>UTF-8</project.reporting.outputEncoding>
<java.version>1.8</java.version>
</properties>
<dependencies>
<dependency>
<groupId>org.springframework.boot</groupId>
<artifactId>spring-boot-starter</artifactId>
</dependency>
<dependency>
<groupId>org.springframework.boot</groupId>
<artifactId>spring-boot-starter-test</artifactId>
<scope>test</scope>
</dependency>
<dependency>
<groupId>org.springframework.boot</groupId>
<artifactId>spring-boot-starter</artifactId>
</dependency>
<dependency>
    <groupId>org.springframework</groupId>
    <artifactId>spring-web</artifactId>
</dependency>
<dependency>
    <groupId>org.springframework.boot</groupId>
    <artifactId>spring-boot-starter-web</artifactId>
</dependency>
<dependency>
<groupId>org.springframework.boot</groupId>
<artifactId>spring-boot-starter-test</artifactId>
<scope>test</scope>
</dependency>
</dependencies>
<build>
<plugins>
<plugin>
<groupId>org.springframework.boot</groupId>
<artifactId>spring-boot-maven-plugin</artifactId>
</plugin>
</plugins>
<resources>
        <resource>
            <directory>src/main/resources</directory>
            <filtering>true</filtering>
        </resource>
        </resources>
</build>
<repositories>
<repository>
<id>spring-snapshots</id>
<name>Spring Snapshots</name>
<url>https://repo.spring.io/snapshot</url>
<snapshots>
<enabled>true</enabled>
</snapshots>
</repository>
<repository>
<id>spring-milestones</id>
<name>Spring Milestones</name>
<url>https://repo.spring.io/milestone</url>
<snapshots>
<enabled>false</enabled>
</snapshots>
</repository>
</repositories>
<pluginRepositories>
<pluginRepository>
<id>spring-snapshots</id>
<name>Spring Snapshots</name>
<url>https://repo.spring.io/snapshot</url>
<snapshots>
<enabled>true</enabled>
</snapshots>
</pluginRepository>
<pluginRepository>
<id>spring-milestones</id>
<name>Spring Milestones</name>
<url>https://repo.spring.io/milestone</url>
<snapshots>
<enabled>false</enabled>
</snapshots>
</pluginRepository>
</pluginRepositories>
</project>
9.  Now open file application.properties under C:\Projects\spring-boot-rest-2\src\main\resources and add the below lines in it:
server.port=8083
spring.profiles.active=@spring.profiles.active@
10.  Now open the command prompt window and go to the project home directory in the command prompt. In my case, it looks like this:
cd C:\Projects\spring-boot-rest-2
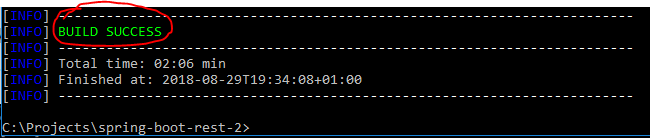
mvnw clean package
If everything goes fine, you can see the below result:
Image title
Now run the server:
java -jar target\spring-boot-rest-2-0.0.1-SNAPSHOT.jarImage title
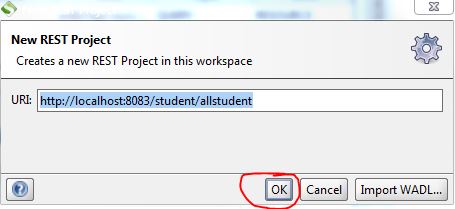
11.  Once the server starts successfully, we will test get GET request first. Open your SOAPUI tool. In SOAPUI tool from file menu select New REST Project and put the below URL in the address bar and press OK. (File=>New REST Project)
http://localhost:8083/student/allstudent
Image title
12. Now, from the SOAPUI project explorer menu, expand your project and double click on Request1 and click the green arrow button:
Image title
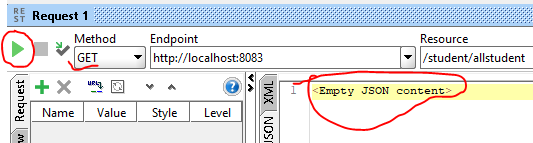
Now you can see the above information. The reason is our student list is empty at the moment, and to store student information, we need to insert some values in it. For that, we will use the POST service that we have already implemented.
13. Follow step 10 and insert the below URL in the address box and click OK.
http://localhost:8083/register/student
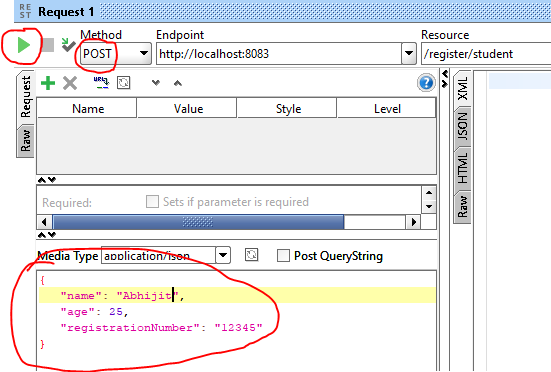
14. Now you have to select POST this time from Method combo box for a post request. Once you select POST Media Type, sub pane will emerge from where you have to select media type to application/json  like below and put the below json body in it and click the green arrow button, which will add the information into our application.
Image title
Image title
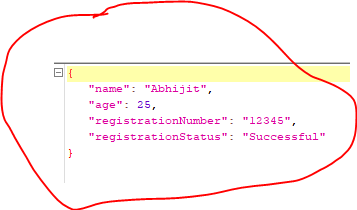
15. Now go to the GET request project (step 12) and click the green arrow button. You can see one record like below:
Image title
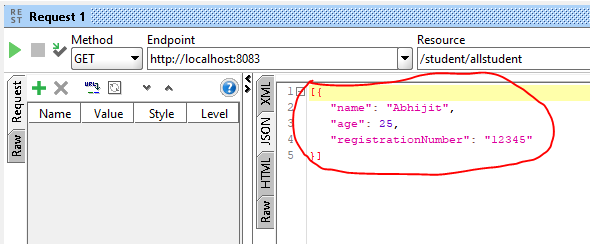
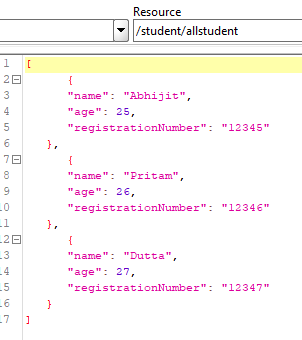
16. Now go back to POST request test (step 14) and add at least three records and call the GET request (step 11) and see:
Image title
Until now, we have learned how to implement GET and POST services. Now we will learn PUT and DELETE requests.
17. Now introduce the controller classes to handle PUT and DELETE requests. Follow Step 6 above and add the below two controller classes in it.
Create StudentUpdateController class and modify it like below:
package com.bhaiti.kela.controllers;
import org.springframework.stereotype.Controller;
import org.springframework.web.bind.annotation.RequestBody;
import org.springframework.web.bind.annotation.RequestMapping;
import org.springframework.web.bind.annotation.RequestMethod;
import org.springframework.web.bind.annotation.ResponseBody;
import com.bhaiti.kela.beans.Student;
import com.bhaiti.kela.beans.StudentRegistration;
@Controller
public class StudentUpdateController {
@RequestMapping(method = RequestMethod.PUT, value="/update/student")
@ResponseBody
public String updateStudentRecord(@RequestBody Student stdn) {
System.out.println("In updateStudentRecord");   
    return StudentRegistration.getInstance().upDateStudent(stdn);
}
}
Create StudentDeleteController and modify it like below:
package com.bhaiti.kela.controllers;
import org.springframework.stereotype.Controller;
import org.springframework.web.bind.annotation.RequestMapping;
import org.springframework.web.bind.annotation.RequestMethod;
import org.springframework.web.bind.annotation.ResponseBody;
import org.springframework.web.bind.annotation.PathVariable;
import com.bhaiti.kela.beans.StudentRegistration;
@Controller
public class StudentDeleteController {
@RequestMapping(method = RequestMethod.DELETE, value="/delete/student/{regdNum}")
@ResponseBody
public String deleteStudentRecord(@PathVariable("regdNum") String regdNum) {
System.out.println("In deleteStudentRecord");   
    return StudentRegistration.getInstance().deleteStudent(regdNum);
}
}
NB: In reality, you don’t need four controller classes to handle four different REST service calls. One controller class will suffice, but for clarity, I have introduced four different controller classes in this article.
18. Now stop the server (by using Control-C), and compile the code, and run the server again.
19. First, insert three to four records into the system by using POST call and retrieve the records by using GET test mentioned in step 12.
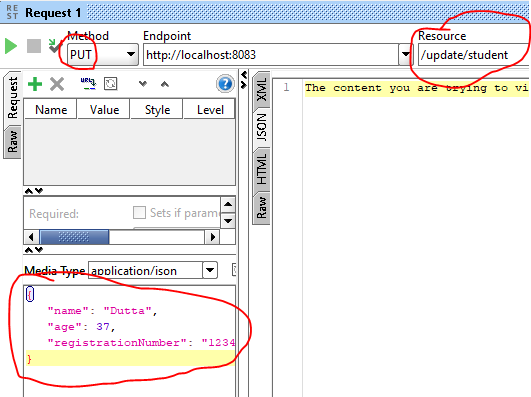
20. Now we will modify a record here, for that create a new REST project in SOAPUI tool and use the below URL and this time select PUT from method combo box and modify the records as shown below:
http://localhost:8083/update/student
Image title
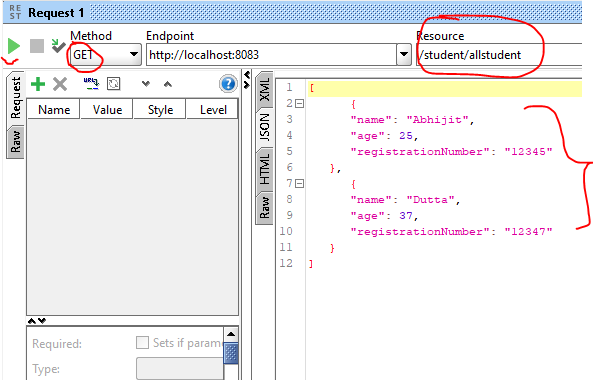
Once you click green arrow button this information will be updated in the system. Now see the result, just do the GET call and check.
Image title
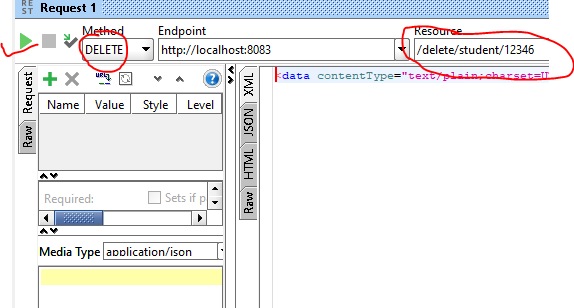
21. Now finally we will do the DELETE service call test. Just create a REST project in SOAPUI and use below URL and select DELETE from method combo box and enter the record like below and click the green arrow button and to check the final outcome just call the GET service call.
http://localhost:8083/delete/student/12346 (the last numeric value is registrationNumber)
Image title
Image title
If you liked this article, please do not forget to click the like button and let me know your thoughts in the comments section. Thanks!